Newbie Guide

|
Welcome oh brave adventurer! Whether you've come from another dimension or a native of this realm, you're all welcome here! Welcome to BraveRO!
BraveRO is an MMORPG (Massively Multiplayer Online Role-Playing Game) where you can play with a lot of real players in real time. You can share an adventure with a lot of friends you meet along the way. You can choose your job specializations from a wide choices of job classes. Party up with your friends and complete quests or take down boss monsters. Challenge other players in a tournament or wage guild battles. The possibilities are endless!
If you haven't downloaded the game yet, then please take your time in downloading it from the main website and follow this short Installation Guide.
If you wish to reach out to more players, other than interacting with them in-game, you can visit the BraveRO Forums and/or join the Official BraveRO Discord Server
If you're completely new to the game or to this realm, while this guide isn't perfect or absolute, I hope that it will nonetheless be useful in forging your path towards greatness. Also, make sure to read up on the BraveRO Server Rules to avoid breaking any of them.
Contents
- 1 STEP 1: Creating a Character
- 2 STEP 2: Choosing Your Class
- 3 STEP 3.1: Leveling and Job Changing
- 4 STEP 3.2: Game Commands and Shortcuts
- 5 STEP 4.0: Tutorial Quests and Achievement System
- 6 STEP 4.1: Earning Zeny
- 7 STEP 4.2: Getting Equipment
- 7.1 BraveRO Custom Weapons
- 7.2 Equipment and Card Advisor NPC
- 7.3 Daily Quest Missions
- 7.4 Vote4Points Shop
- 7.5 Death Match Shop
- 7.6 Headgear Quests
- 7.7 Automated Events
- 7.8 MVP Hunter
- 7.9 Fused MVP Cards
- 7.10 Refining Equipment
- 7.11 Seasonal Events
- 7.12 Battlegrounds
- 7.13 Instances
- 7.14 Casino
- 7.15 Donation Path
- 8 STEP 5.1: Road from Hero to Elite
- 9 STEP 5.2: Joining PVP
- 10 EXTRA STEPS: Roads Beyond Elite
- 11 Other Useful Pages
- 12 Common Mistakes
STEP 1: Creating a Character

If you haven't made an account yet, you need to register an account first. Once that's done, run the game's patcher to see if there are any available patches and hit the Start Game button once it's done patching.
When the game has launched, you'll be greeted by the server/proxy server selection screen. Try and test which server has the best and stable connection for you on your end after you've logged in with your character.
After the server selection screen, you'll then be moved to the login screen. Type here the username and password that you have registered.
Now you're in. If it's your first time playing, you'll see that you have nine empty character slots. These slots are fixed and cannot be increased in any way. Simply choose a slot that you wish to create a character in and double click it. You can alter a character's slot location by logging in your account in your account in the main website, select Account at the top right corner, select your My Account, click on the character name that you wish to change its slot, and click on Change Slot near the top of the page.
You can either choose to play as a Human or as a Doram character. Humans are the default class and have a wide variety of job specializations. They also have access to the Hero System. Dorams on the other hand only have one job class, which is the Summoner class. They currently are unable to become Heroes.
Once you've selected the race, type in your chosen character's name and adjust the gender, hairstyle, and hair color. Don't worry if you've made a mistake in your character's appearance. You can change your character's hairstyle, hair color, and clothes color via the Stylist function of the Main NPC. For a fee, you can change your character's gender by availing of the Crazy Scientist's service (not available for Bard/Dancer job classes) inside the Quest Room (casp_in01 56 192). Also for a fee, and with the use of a Change Name Scroll, you can change your character's name.
Once you've finally decided on your character's name and appearance, click the Create button. Afterwards you'll be moved back to the character selection screen. You can now finally enter the world of Midgard and begin your journey by clicking on the Login button or double clicking on your character.
Main NPC
If you're new to the server, you might want to familiarize yourself with the functions that the Main NPC provides. This NPC contains quite a lot of useful services that you might want to use. Quite a lot of new players are confused where to find most basic stuff, like job changing, so please familiarize the Main NPC.
| MAIN NPC | |
|---|---|
| Service | Details |
|
Save & Storage |
|
|
Job Changer |
Allows you to change your character's job class. Please refer to the Job Changing section below for more info. |
|
Warper |
Allows you to warp to quite a lot of fields, dungeons, instance entrances, custom maps, etc. While you can also use @warp to warp to most maps, certain maps like Biolabs 3 and 4 doesn't allow to you use @warp to go inside, so you might want to use the Main NPC's service. |
|
PvP Master |
|
|
Mall & Vending |
|
|
Hero Temple |
Warps you to the Hero Temple. This is where you can find NPCs that will help you on your journey to become a Hero, and ultimately, into an Elite Hero. |
|
Universal Rental |
Allows you to rent certain things, like Carts, Falcons, Peco Pecos, Dragons, Gryphons, Magic Gear, and Warg.
|
|
Stat/Skill Reset |
|
|
Stylist |
|
|
ATM/Banker |
|
|
Identifier |
Allows you to, well, identify equipment that are yet to be identified, which saves you the use of a Magnifier. Alternatively, you can use the @identifyall command. |
|
Platinum Skills |
Allows your character to learn the currently available Platinum skills for their current class. |
|
Testing Rooms |
|
|
Refine Shop |
|
|
Vote for Points |
|
|
Channel Settings |
|
STEP 2: Choosing Your Class

Main Article: Job Explanations
They say nothing beats experience as the best teacher. No matter the reason for choosing a path, be it for utility, design, gameplay, or features, mastering a class takes time and patience.
Below are the available some guides for the highest job advancements that Heroes can choose (except for Dorams/Summoners which currently isn't applicable to become a Hero). However, take note that a lot of these guides have become outdated due to the availability of newer and better equipment as of late. But regardless, may these guides serve to gently guide you to a path of understanding with your chosen class. You can use the NPC Item Catalog to find where to buy an item that's being indicated in a guide. If you can't find the item in the Item Catalog, then it's most likely only obtainable during seasonal events.
|
|
You might want to decide on a specific job in advance for a specific purpose/reason, or you might want to just choose a job that you like. It's entirely up to you.
STEP 3.1: Leveling and Job Changing

After logging in for the first time, you'll be warped into the introductory area. You can spend a few minutes trying to kill the monsters there or directly talk to the BraveRO Greeter NPC.
Please make sure to have at least 300 STR when opening the Infinite Yggdrassil and Infinite Box of Thunder Boxes, especially if you're carrying lots of heavy items. The items that you get once they are opened are quite heavy, and opening them when you don't have enough weight capacity will result in you not getting the item. This is a common mistake by players. As with anything, please make sure to read item descriptions first.
If you're don't really want to have 300 STR on your character, just as mentioned above, just make sure to have 300 STR when opening the boxes. You can always reset your stats and skills.
By talking to the BraveRO Greeter NPC, you'll be immediately given the following items:
- 1x BraveRO Newbie Manual
- 1x BraveRO Rule Book
Regardless if you wish to take the test or not, you'll be given the following items:
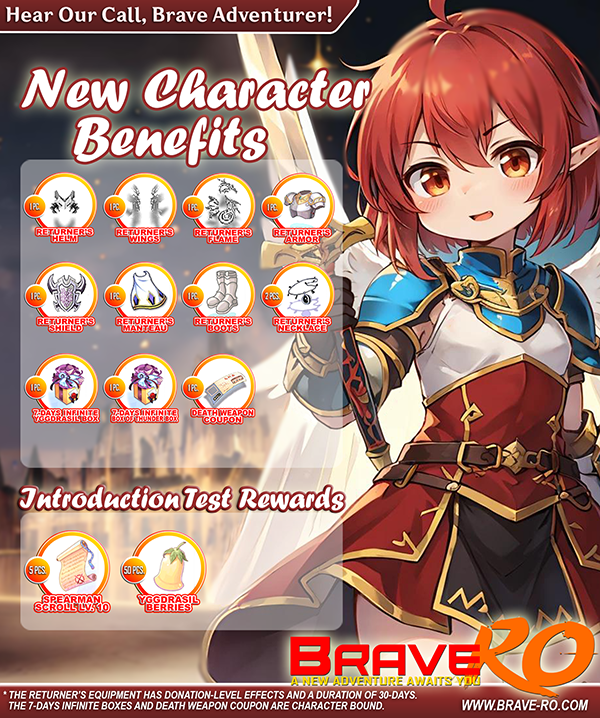
- Returner's Set (30 days. Character Bound) (Despite the name, this set is given to all newly made characters)
- 1x 7-Days Infinite Yggdrasil Box (Character Bound. Do not open this box unless you have enough weight capacity. Otherwise, the item will be lost)
- 1x 7-Days Infinite Box of Thunder Box (Character Bound. Do not open this box unless you have enough weight capacity. Otherwise, the item will be lost)
- 1x Death Weapon Coupon (Character Bound)
After completing the Introduction Test, you'll be given the following items:
- 50x Yggdrasil Berries
- 5x Spearman Scroll 10
If you're a new player, it's advisable to take the Introduction Lesson and Introduction Test, and make sure to thoroughly read the dialogues. If you decide to take the Introduction Test, you might want to kill a few monsters first before talking to the BraveRO Greeter NPC and increasing your STR stat to at least 80+. This is because once you've passed the Introduction Test, you will be rewarded some Yggdrasil Berries. If you don't have enough weight capacity, the berries will just drop to the ground and you'll be unable to get them. No need to worry if the berries do drop, they're easy to farm anyway. The Spearman Scroll is really useful in helping you kill monsters while leveling, so you might want to take the introduction test.
The Returner's Set will last for 30 days and give donation-level effects. However, cards cannot be placed into these equipment. The accessories have a level requirement of at least 100 before you can wear them. The Returner's Set effects can be seen in the table below. The Spearman Scroll 10 can be used to summon a 10th Grade spear mercenary, which can help you kill mobs while leveling. If you wish to get more of these Spearman Scroll, you can purchase them via the Mercenary NPC in caspen 186 218.
Take note that the Returner's Set, infinite boxes, and the death weapon coupon are character bound, thus you can't transfer them to your storage. Make sure to open the infinite boxes when you have enough weight capacity, as mentioned above, otherwise, the box will be opened, but you can't get the item inside.
The Death Weapon Coupon can be exchanged via the Death Weapon Freebie NPC in @go level, and you can't use this via the Achievement Manager in Caspen. Make sure to exchange this coupon once you've decided on a job class. You can refer to the Death Weapons List and Effects.
| Revamped Returner's Set Effects Rental Items: 30-days Duration |
|||
|---|---|---|---|
|
Returner's Helm
|
Returner's Wings
|
Returner's Flame
|
Returner's Armor
|
|
Returner's Shield
|
Returner's Manteau
|
Returner's Boots
|
Returner's Necklace
|
|
SET EFFECT:
|
|||
|
SET RESTRICTIONS:
|
|||
| Old Returner's Set Effects Rental Items: 30-days Duration This set effect is no longer applicable. |
|||
|---|---|---|---|
|
Returner's Helm
|
Returner's Wings
|
Returner's Flame
|
Returner's Armor
|
|
Returner's Shield
|
Returner's Manteau
|
Returner's Boots
|
Returner's Necklace
|
In addition to the Death Weapon that you can obtain, you also have a Knife on your character/inventory. However, fret not! You can buy cheap weapons for your class from the various shops in @go 48 or from the Beginner Weapons NPC in @go level. Don't worry about Zeny for now. Your character is given 2,000,000 Zeny as a staring money, which should be enough to buy a simple weapon and some ammunitions (if applicable).
Remember that here in BraveRO, for all classes that uses ammunitions (e.g. Arrows, Bullets, Cannon Balls, etc.), the ammunition won't be consumed every normal attack or skill use. You only have to bring the minimum amount for your skills to be casted. For example, if you're using a Ranger, since Arrow Storm requires 10 arrows, you only have to bring 10 arrows. Of course, if you want to bring all kinds of elemental arrows, you need to just bring 10 pieces of each type.
Normal Leveling
Main Article: Leveling Guide
If you're new to the game or you're a seasoned player that wishes to experience the thrill of leveling, then this is the option for you.
For the most part, unless you're careful, you might want to use the Spearman Scroll 10 that was given to you. Press CTRL + R to access the mercenary menu, and click Skill. This opens up the mercenary's skill menu. Drag the Spiral Pierce skill to your skill bar (press F10 if the skill bar is missing). From there, simply press the hotkey/shortcut that is associated with the slot in which you've placed the skill, and target monsters with it. This makes the spearman use its own skill to kill monsters. This skill has fairly high damage and can kill most low level monsters in Poring Island and Death Field (@warp izlu2dun) in just one cast. Monsters killed by your mercenary also gives experience to your character, so you can let the mercenary do most of the work for you.
Job Changing
Main Article: Job Changing
There's no job change quest needed. Simply talk to the Main NPC and choose the Job Changer Option. As a note before changing jobs, make sure you max out your job level first, regardless of your actual base level. Access your skill window by pressing ALT + S. Additionally, before changing jobs, make sure that you have completely used up all skill points. Otherwise, you might accidentally delete them. Depending on the path in which you decide to take, these are the routes that you can choose from.
IDEAL JOB CHANGE PATH FOR REGULAR JOBS
- As a Novice, gain experience until you reach Job Level 10.
- Job change into your First Job as a Swordsman, Mage, Archer, Merchant, Thief, or Acolyte.
- Gain enough experience until you reach Job Level 50.
- Job change into your chosen Second Job.
- Gain enough experience until you reach Job Level 50 again and at least Base Level 99.
- Job change and select Choose to be Reborn.
- Gain experience until you reach Job Level 10.
- Job change into your previous first job.
- Gain enough experience until you reach Job Level 50.
- Job change into your Transcendent Job Class.
- Gain enough experience until you reach Job Level 120 (or 70, whichever is applicable).
- Job change into a Third Job class.
- From here, simply gain levels until you've reached a Base Level of 500.
Unless you know what you're doing, if you choose to become a Third Job immediately instead of being Reborn, you'll be unable to access your class' Transcendent skills, putting you at a disadvantage.
IDEAL JOB CHANGE PATH FOR BABY JOBS
- As a Novice, talk to the Main NPC, choose the Job Changer option and choose Baby Job Changer. This will turn you into a Baby Novice.
- Gain experience until you reach Job Level 10.
- Job change into your First Job as a Swordsman, Mage, Archer, Merchant, Thief, Acolyte, or Super Novice.
- Gain enough experience until you reach Job Level 50.
- Job change into your chosen Second Job.
- Gain enough experience until you've reached a Base Level of 500.
- To change into a Third Job class, go to the Baby 3rd Job Changer NPC in caspen 157 224, right behind the Rare Collector NPC.
Unless you know what you're doing, choosing to become a Baby Class has the immediate disadvantage of having no access to the Transcendent Skills, and they have lower stats compared to normal classes. Take note that a Baby Novice also cannot job change into a Ninja, Gunslinger, or a Taekwon Kid.
IDEAL JOB CHANGE PATH FOR EXTENDED JOBS
- As a Novice, gain experience until you reach Job Level 10.
- Job change into your Extended First Job as a Ninja, Gunslinger, or Taekwon Kid.
- Gain enough experience until you reach Job Level 50 (or 70, whichever is applicable).
- Job change into your chosen Extended Second Job.
- Gain enough experience until you've reached a Base Level of 500 and the maximum job level for your class.
Skip Leveling
Main Article: Instant Job Changer
If you're a seasoned player or you just don't wish to burden yourself with the process of leveling a new character, you can opt to skip leveling and instantly change jobs. For this you can talk to the Instant Job Changer NPC in Poring Island (@warp poring01 126 210). This NPC's service is free. Regardless of the base level, your job needs to be a Novice to use the Instant Job Changer service. Changing into a Baby Novice will prevent you from using this service. Dorams also cannot use this service.
The Instant Job Changer NPC will allow you to choose from all available human job classes, instantly become base level 500, instantly get the maximum job level for your chosen class, and all skill applicable to your class are all upgraded to their maximum skill levels.
Trying to reset your skills will only return enough skill points as if you've normally leveled. However, to remedy this, you can talk to the Main NPC, select Stat/Skill Reset, and choose the Max All Skill option. As the name implies, this instantly sets all of your skills to their maximum level.
If you chose to use the Instant Job Changer NPC, you will be unable to acquire the extra Bubblegum item from an achievement once you've reached level 500.
Stat Points
Main Article: Stats
When leveling up, aside from skill points, you also gain stat points. You can access the stat window by pressing ALT + A. Increasing certain stat points generally affect how your chosen class performs. You might want to look up on job builds and guides to see which one would fit your style of play. Rather than manually adding stat points one at a time by clicking your stat window, you can instead type /str+ 99. Simply replace the number and the stat (str, agi, dex, vit, luk, int) that you wish to add. Take note that there's a space between the + and the number.
STEP 3.2: Game Commands and Shortcuts

Since most new players often try to look for Fly Wings when starting out, we're just gonna state this here. You basically don't need to use Fly Wings to move around. You can instead just use the @jump command, instead of buying a lot of Fly Wings. To instantly warp to specific maps, you can use the @warp command (ex. @warp prt_fild09' or @warp prt_fild09 123 145).
Client Commands
Main Article: Client Commands
These are the basic commands that you'll be using.
@Commands
Main Article: @Command List / Warping & Teleporting
These commands offers a wide variety of convenience when playing. Familiarize these commands and memorize those commands that you use often.
Keyboard Shortcuts
Main Article: Keyboard Shortcuts
Rather than using your mouse and clicking things on your screen, it's much more efficient to familiarize and memorize these shortcuts.
STEP 4.0: Tutorial Quests and Achievement System

Guide Quests
As of April 3 2023, the Guide Quest NPC was added in caspen 179 212. Talk to this NPC to start the Guide Quests which all give a bunch of useful rewards and some basic server information. Completing certain Tutorial Quests will also unlock Challenge Missions.
Each time you complete a Challenge Mission, it will be replaced with a higher level mission of the same name. These Challenge Missions also grant rewards once you've satisfied the requirements for each level.
There's no rush in completing all of the Guide Quests and Challenge Quests. If you constantly play the game and do most of the things indicated in the Tutorial Quests a lot, you'll eventually complete them. Take note that these Missions are account bound, so you can do those activities using any character in your account and they will all count towards completing the Missions.
You cannot proceed to the next Guide Quest without completing the current one. If you're a veteran player that owns a character that has already pre-completed some of the quests (like becoming a Hero), simply talk again to the NPC in order to complete the quest.
|
1. Answer a Basic Question
|
9. Introduction to Mining
|
Upon starting the Guide Quests, any progress that are related to completing Challenge Missions are saved and accumulated. For example, in doing the Challenge Mission for Daily Quest, if you already completed Daily Grind 1 (complete 7 Daily Quests), when you proceed to Daily Grind 2 (complete 15 Daily Quests), your progress will show as 7/15. However, take note that any progress that you've done prior to starting the Guide Quests are not counted.
For Quest #8 Bring 3 Herring, you can just bring 3x Herrings if you have them already beforehand, someone gives them to you, or you're able to buy them. This skips the need to wait and be lucky in trying to actually fish for some Herring.
Achievement System
Main Article: Achievement System
By doing various aspects of the game, they may give Achievement Rewards. This system was implemented way before the Tutorial Quests as indicated above. Some of the highest level achievements may be bugged and you might need to create a Helpdesk Ticket for it to be resolved. Take note that these achievements are character bound, so you want to get these achievements on another character, you will have to do them from scratch.
STEP 4.1: Earning Zeny

Vending Items
Main Article: Vending Area
Probably the most straightforward way of earning Zeny. You can broadcast or make a pub to advertise that you're selling items directly to other players. If you're unable to purchase from a vendor inside the vending area, it might be one of the following situations:
- You're trying to buy from a shop that sells items using currencies other than plan Zeny (eg. Zeny Bags, BraveRO Tokens, or any other NPC shops). You need some small amount zeny in order to buy from these shops. So, if you have basically zero zeny on your character, you won't be able to buy from them.
- You're trying to buy from a shop that sells items via Zeny. If you're trying to buy from a vendor in zeny but there's an "out of stock" message even though the vendor still has 100 pieces of that item, it means that they have reached the max amount of zeny (2B) for their character. There's a system in the vending area that checks the vendors' zeny and turn them into zeny bags for convenience. Thus, you can try returning to the same vendor after an hour.
With a merchant you can also go to @go vend and set up shop there. After setting up your merchant vendor, you can type in @autotrade to allow your merchant to vend while you're offline. If you wish that your merchant will continue to vend, make sure not to login the account that contains the merchant. For this reason, players often make separate accounts for the sole purpose of vending items.
Automated Events
Main Article: Automated Events
- Every thirty minutes, treasure boxes will spawn in a random map that contain a 500M Zeny Bag. An announcement will be made one minute before the boxes spawn and it will also indicate the map they will appear. There will be a lot of treasure boxes but only five of them contains the rewards. Winning some of the other automated events (Poring Catcher, Dice, Goblin Invasion) will grant 1B Zeny Bags and a Trophy. Winning them the first time on a character also grants Zeny Bags as an Achievement Reward.
Winners for Poring Catcher, Dice, Goblin Invasion, and Survival get a certain amout of 1b Zeny Bags as a reward, which you can use to various items in-game from selected shops or from other players.. Use the command @schedule and @time to see when the next automated event is coming up.
- Poring Catcher - Find the correct poring that is named Poring. The other monsters and porings will have names to confuse players. Other monsters will also be in the map like Drops and Marin.
- Any classes are technically viable to use for this event. However, if you have sharp eyes and you want to hit the correct poring before anyone else, using ranged classes might be advantageous.
- Dice Event - Pick and choose a number for every round and stand in that number's box. The last player standing wins.
- This boils down to pure luck. Thus, you can bring any classes to this event.
- Goblin Invasion Event - Find and kill the goblin named Goblin Leader. Classes that can cast water-element area of effect skills are commonly used for this event. Additionally, the goblins themselves drop useful consumable items.
- As mentioned, you will want to use classes that have water-element area of effect skills. Warlocks can use Storm Gust. Shadow Chasers can copy Storm Gust. Rangers can use Arrow Storm with a Crystal Arrow. Genetics can use Cart Cannon while using a Elemental Converter [Water]. Super Novices can also use Storm Gust, provided that they are wearing headgears that give that skill to them (Mystic Hoodie, or any vanilla upper headgear enchanted with Hailstorm)
- Survival Event - Do your best to hide and run from Murder Porings. Be the last player standing in the map to win. You can join using any job class.
- Due to some classes and items having an advantage over other players, some restrictions have been placed. You cannot use Mercenaries. If you have them deployed before entering the Survival portal, you will need to dismiss them.
- If you're a Genetic class, you cannot enter the map with a Homunculus. So, you will need to make them rest.
- If you're a Super Novice, you will be killed when you enter the map. This is to prevent you from having a bonus life via a Super Novice's hidden skill, Steel Body. After getting killed when entering the Survival Map and you keep getting kicked, try logging out and enter the portal again.
Zeph Missions
Main Article: Zeph Missions
For new players, this would be your bread and butter activity if you want to earn Zeny. Even for veteran players, this is still a good source of Zeny. What's Zeph Mission? Basically kill the required number of monsters and you'll be rewarded with Zeny and some DM (Death Match) Points. Recommended jobs to do Zeph Missions are classes that have/can have access to area of effect skills like Warlocks, Rangers, Genetics, Shadow Chasers, and Super Novice.
Daily Quest Missions
Main Article: Daily Quests
While a few items that the Daily Quest NPC sells can be vended to other players, you can also try your luck by purchasing and using Lucky Scratch Off Tickets to win Zeny Bags. Most of the time, you'll get nothing. But if you're lucky, you can get a minimum of 1x 250M Zeny Bag, up to the maximum jackpot of 15x 1B Zeny Bag. However, if you're still new, it's not recommended to waste your Daily Quest Tokens to just purchase those tickets. Better save up your tokens to purchase equipment first.
If you're an avid fan of doing Zeph Missions, you have to potential of collecting a lot of loot. Create a personal guild that you're the only member and store Miscellaneous items and Cards that you loot in the guild storage (@gstorage). Those items can be used when doing Daily Quests and Scavenger Hunts. Saving those items while doing Zeph Missions will eventually save you time and hassle down the road.
Doing Instances
Sell useful items that you can find within instances to other players. The easiest instance that a new solo player could finish is most likely the Endless Tower, but it still required some gear and knowledge of the monsters inside to finish it. Characters that like using Mora Equipment may have to complete the Wandering Guardian Quest (completed along with Hazy Forest Instance) in order to access Mora Coins and other Mora Quests and eventually be able to enchant Mora Equipment. The harder instances (especially the ones that are custom and the official ones that have been modified) are somewhat doable if you're already geared enough and are familiar with the mechanics of the instance/s that you're doing.
Catching Fishes
Main Article: Fishing System
As the name implies, you'll be catching fishes. A successful catch grants you that fish, some Social Coins (previously called Fishing Coins), and if you're lucky, a bunch of other items. Social Coins can be exchanged into various Miscellaneous Items, Fishing Gears, and Vanilla Headgears. The Fishing Level is Account Bound. This means that even if you try to fish using a different character in the same account, that character will still have the same Fishing Level. However, the stats provided by fishing gears in another character does not affect other characters. Thus you need to equip or transfer the fishing gears if you want to fish using a different character.
Scavenger Hunt
Main Article: Scavenger Hunt
It's basically a free-for-all Daily Quest that you can do once per hour. Whisper anything to npc:ScavengerHunt to know the current required items without directly talking to the NPC. Of course, you'll need to actually talk to the NPC once you submit your items. A nifty trick to finishing a Scavenger Hunt fast is to create a guild and store all of the cards and miscellaneous items inside the guild storage (@gstorage), all ready for the next submission.
Scavenger Hunts reward players with Death Match Points (DM Points). These DM Points can be used to purchase zeny bags (and other items) via the Death Match Shop
Death Match Points
Main Article: Monster DM Points
As a new player, the most accessible location to farm DM Points would be Caspen Dungeon. With the recent update on Death Match Points, the monsters inside will now give 1 DM upon death. This means that you can save a lot more DM Points now than before. Using a Strawberry Hat or items with same effects, they now grant a 10% chance of getting double DM points when killing a monster.
These Monster Points can then be exchanged into Death Match Points (DM Points) via the Death Match Shop Manager. These DM Points can be used to purchase Zeny Bags (and other items) via the Death Match Shop
Honorable Guild Competition
Main Article: Honorable Guild
This is a competition between guilds. However, unlike War of Emperium which is on the PvP side, Honorable Guild Competition is generally a PvE contest where almost every guild can compete as long as they put their hearts and minds into it. Members will be doing various tasks to earn Honorable Points such as Daily Quests, Zeph Missions, Scavenger Hunts, winning Poring Catcher, Dice, Goblin, and Survival autmated events, and Wheel of Fortune. You can look up the top 10 honorable guilds via the Honorable Board at Caspen [caspen 161 192] and then ask around to see if you could join one of them. The top 3 guilds per week will be rewarded one guild castle each. The top 1 guild will also be able to obtain 1x Guild Instance key per week upon claiming of rewards from the guild Treasure Manager. Take note though that only characters that are members of the guilds running for Honorable Guild will be able to earn Honorable Points. Leaving the guild and earning Honorable Points in another guild will remove your points from the previous guild.
Mining for Minerals
Main Article: Mining System
If you have the time to spare, you can try mining for minerals. Take note that this system is quite time consuming. Increasing your Miner Level is essential to gain access to better mines and level up essential Mining Skills that will make your time easier. Note that the Miner Level is character bound. This means if you're already at miner level 100 in one character, if you try to mine using a new character, that character will have a Miner Level of 1. The minerals that you get can sell for quite a lot of zeny if you have a lot of them in stock. Alternatively, you can instead use those minerals to forge equipment using the Forging System.
If you're a new player, you might want to skip this and take up mining at a later time because getting a lot of useful minerals is quite time consuming.
Forging Equipment
Main Article: Forging System
If you have saved a up a bunch of minerals (or bought a lot from other players), you can try your luck in creating items for yourself, your friends, or to sell. Most of the newer forged items can sell for quite a lot. The same as Miner Level, the Forger Level is character bound. Also, if you're a new player, much like mining, you might want to skip this and take up forging once you've saved a lot of minerals, items, and zeny.
Casino
Main Article: Casino Press Your Luck
Especially during the random times that other players choose to put a bunch of 1B Zeny Bags via the NPC, participating in Press Your Luck (PYL) might be worthwhile if you have some spare Zeny to spend. A few other NPCs, like the Headgear Gambler NPC store the zeny that players spend on them, and if you hit their jackpot, you'll be able to acquire all of the Zeny that the NPC is currently holding.
Donation Path
Main Article: Donation Rewards - Currencies
If you have donated to the server and acquired Donation Credits, talk to the Donation Girl NPC to purchase various in-game currencies. Only the 1B Zeny Bag and BraveRO Token are tradable, but you can use the other currencies to buy tradable items that other players might want to buy and sell those items.
- 1B Zeny Bags (Can be Traded)
- BraveRO Tokens (Can be Traded)
- War Badges / Elite Temple Discounted War Badge Shops (Account Bound)
- Heroic Coins (Account Bound)
- Combat Coins (Account Bound)
- Victory Badge (Account Bound)
- Seasonal Currencies (Account Bound)
STEP 4.2: Getting Equipment

Since, well, this is a custom server, please expect that a bunch of items that you might see in other servers aren't available here. Most endgame items that you might want to go for are all customized for BraveRO. Some items from other servers might not even be available due to balancing issues, but there might be better alternatives that you can look out for.
BraveRO Custom Weapons
Main Article: Custom Weapons
For your reference, here are the custom weapons that can be found in BraveRO:
- Death Weapons - With the update to this weapon types, these will be your bread and butter weapons for early game. Some classes also have uses for death weapons even after becoming an Elite Hero.
- Glorified Weapons - Acquired after completing the Hero Quest and claiming from Blacksmith Regin. These are generally inferior compare to Death Weapons.
- Rank C and B Weapons - Obtainable from completing the Rank C, and Rank B Hero Weapon Quest respectively. Much like Glofiried weapons, these weapons are overshadowed by Death Weapons. Although certain weapons, like Gastraphetes (Bow) still have their uses.
- Elite Weapons - Much of the Elite Weapon's effects are tailored for your chosen class. As such, these weapons are one of the best in-game at the moment. Though for certain classes in certain situations, they might opt to using Death Weapons and/or Shapeless Weapons
- Christmas Weapons - These weapons' effects are geared towards PvE.
- Druid Weapons - These weapons' effects are geared towards increasing your damage against Boss monsters.
- Shapeless Weapons - Certain classes in certain builds prefer using Shapeless weapons with specific enchants.
Equipment and Card Advisor NPC
Main Article: Gear Advisor
As of March 18, 2026, a version of the Gear Advisor has been added to the main website.
While you could follow the guides in the current list of guides, quite a lot of them are outdated and do not feature newer items released. But worry no more!
Look for the Gear Advisor in caspen 159 195. This NPC will use the equipment data collected to recommend the most commonly used equipment and cards by Elite Heroes. This should help newbies and veterans alike to have an idea of what items they should focus on and insights on the effects of such items.
- Provides the top 10 Overall or Class Specific equipment & Cards worn by Elites.
- Ability to filter the Equipment & Cards for PvP or MvP.
- Collects data automatically and updates NPC instantly.
- Provides the item description of the most commonly used items.
If a Job Class is currently not listed on the NPC, it means that the NPC currently has no data for the job class. The NPC only collects data from Elite Heroes Level 3 or higher. The class will automatically be included onto the NPC as soon as enough data becomes available.
Daily Quest Missions
Main Article: Daily Quests
Save up the Daily Quest Tokens that you get from doing Daily Quests and purchase various headgears, account bound boss cards, and account bound death weapons.
Vote4Points Shop
Login your account in the main website and navigate towards the upper part of the website. Click on Account and then choose Vote for Points. You'll then be redirected to another page that has six vote sites. Click on each one, and accomplish whatever task is required. After completing all of them, refresh the Vote for Points page, and you'll receive the vote points. Your points should be listed as Current Vote Points. If you voted while your account is online in the game, they'll be listed as Accumulated Vote Points, and they cannot be claimed. To fix this, simply logout your account, and refresh the Vote for Points page. After that your points will now be listed under Current Vote Points.
You can claim your Vote Tokens via the Vote4Points NPC in @warp caspen 147 211. Since there's a character bound achievement when claiming Vote Tokens, make sure you're using a character that still hasn't completed the achievements so as not to waste the rewards. You can check the achievements your character has by using the @acheck command.
Death Match Shop
Main Article: Death Match Shop
Earn Death Match Points in order to be able to buy various items from this shop. As of March 14, 2024, the Death Match Shop and Death Match Points System has been revamped. Now, you can earn more DM Points from doing various activities!
Headgear Quests
Main Article: Headgear Quests
Probably one of the easiest ways for a new player to gear their character with some headgears. Highly recommended to gather the required materials using a character that has large area of effect skills.
Automated Events
Main Article: Automated Events
- MVP Guild Raid - Join a guild and take down bosses and phantoms inside the Guild Raid map to earn Void Essence (purchase Vanilla Headgears) and Enchanting Rose (enchant Vanilla Headgears).
- If you have collected the trophies from winning Poring Catcher, Goblin Invasion, and Dice, you can exchange them for a Fortune Headgear Chest! For one Fortune Headgear Chest, the Fortune Headgear NPC [casp_in01 74 196] will take one of each trophy. The Fortune Headgear Chest will randomly grant you one custom BraveRO headgear.
MVP Hunter
Main Article: MVP Hunter / Hunting MvPs
If you're a PvE enthusiast, then one of the things that you probably like doing is hunting down MvP monsters out in the open. Their cards are often useful, and some of them are used in the creation of Fused MvP Cards. Additionally, if you find it a hassle to searching maps where MVPs spawn, or your luck ran out in using Bloody Branches, the MVP Hunter offers a solution to your problems.
Here are a few classes that you could try as a new player to try and hunt MVPs. If you're still starting, you can use your Returner's Set. However, to fully maximize the damage for each class, you will need to invest in weapons, armors, and cards. Also, other classes could hunt MVPs if you build them correctly (e.g Ranger, Rebellion, Sura), but I think for new players, these are the ones that are a bit newbie friendly.
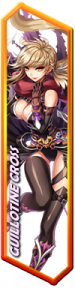
- Guillotine Cross - you can utilize Enchant Deadly Poison to boost the damage of your attacks. Bring some Elemental Converters, Cursed Water, and/or Aspersio Scrolls, you can adapt to the elemental weakness of some MVPs.
- Royal Guard - using Sacrifice skill and maxing out your HP is an easy way of dishing out damage. By maxing out your VIT and getting to 195 attack speed, you should be good to go. You can also opt to go for the Grand Cross build, but you'll need to heal a lot and use Holy Elemental Scrolls to lessen the damage you deal to yourself.
- Soul Linker - with the removal of the restriction of needing to use Es-type skills before using Esma, you can now comfortably spam Esma on MVPs. With Mild Wind, you can easily change your Esma's elemental type to increase your damage against all elemental types.
Fused MVP Cards
Main Article: Fused MVP Cards
Not a really lucrative form of farming for new players since it requires diving into the custom dungeon, Bossnia, and other slightly expensive items. If your character has just become a Hero Character and they have access to water-element area of effect (AoE) skills, then Bossnia might be a good map to start farming for your Hero EXP as well as getting the Red, Blue, and Yellow Charms used for MVP Card Fusion.
Refining Equipment
Main Article: Refining Equipment
In order to increase your weapon's power, and your armor's defense, then refining them is the way to go. You can essentially refine everywhere as long as there's a Main NPC in sight. You can also repair broken equipment for a small fee. Additionally, also for a fee, you can remove cards from your equipment without the risk of losing the card and the equipment. Although, as per the NPC's warning, there's a small chance that removing cards from enchanted equipment/armor runs the risk of losing the enchant stone/s.
Seasonal Events
Be active in the forums or in Discord to know when an event or a seasonal event is going on. These events can reward players with a bunch of useful items and gears, provide that you invest enough time and patience in gathering the required seasonal event materials. In the case of Compendiums/Battlepass, you need to earn enough Battlepass/Compendium EXP to be eligible for the different levels of rewards. It's good to note that when there's an ongoing seasonal event, it's highly recommended that you participate in them to acquire some better equipment for your characters.
Admins or GMs may randomly post redeem codes in Discord that reward players with various items. Note that these codes may have a claim limit, thus it's a first come, first served basis. You can then use these codes via the Gift Code NPC (@warp caspen 179 188) to get those items.
Battlegrounds
Main Article: Battlegrounds
You can get your hands on some pretty decent items by just participating in Battlegrounds. Participation rewards the following items:
Silvervine Fruit
- Can be exchanged into Mora Coins in order to buy and/or enchant Mora Equipment. You can exchange your Silvervine Fruit into Grade A Coins >> Grade B Coins >> Grade C Coins via the Malandgo Coin Exchanger CX-1 NPC (@warp malangdo 221 166). Using Grade C Coins, you can exchange them into Mora Coins via the Dark Merchant K (@warp malangdo 235 177). Take note that only Grade C Coins are eligible to be exchanged for Mora Coins.
- Some classes, depending on the activity might want to use Mora Equipment. You can go to Mora Village by using @go 31.
- Classes that can use Mora Equipment are Rangers, Guillotine Cross, Rune Knights, Arch Bishops, and Warlocks.
- While you can do the Daily Quests available in Mora, it's much faster to get Silvervine Fruit by joining Battlegronds. You can unlock Mora Daily Quests by completing first the Wandering Guardian Quest. Some of the NPCs in Mora Village have their own pre-requisite quests.
- Take note that Silvervine Fruit has other uses aside from being converted into Mora Coins.
Battle Badges
- Are used to purchase a majority of the stuff sold in the Battlegrounds Lobby (@go bg) or inside the Elite Temple.
Yinyang Flowers
- Are usually used to enchant enchant Shapeless Weapons. However, they might have other uses as well.
Victory Badges
- Only obtained when you win a Battlegrounds Round. While you can instantly use these to gamble via the BG Press Your Luck NPC (bg_lobby 65 56), you can instead choose to save them.
- If you've saved at least 100 Victory Badges, you can purchase a Battlegrounds Garment that has really useful effects from the Garment Master NPC (bg_lobby 45 30). You can purchase the following Battlegrounds garments:
- Kingsmen Backup Blades
- Daehyon Backup Sword
- Devil's Mantle
- Elder's Shroud
- Brewmaster's Backpack
- Prowler's Artifact
- Protector's Guard
- Victory Badges are also used by the Garment Master to enhance the equipment level of the Battlegrounds garments, Aqua Fin Garment, Poring Basket Garment, Giant White Rabbit Garment, and Tide and Surf Board Garment.
- Only by enhancing the equipment level you can increase its power and effectiveness.
- Take note that enhancing the equipment level is totally different from refining an equipment.
- While refining an equipment will use items like Oridecon, Elunium, Pure Oridecon, Pure Elunium, Enriched Oridecon, Enriched Elunium, Divinium Ore, and/or a +1 Safe Refine, enhancing an equipment's level will require different items, such as Victory Badges for Battlegrounds Garments as indicated above.
- Sometimes, a special NPC may be made available during seasonal events which allow you to enhance the equipment level of certain garments using seasonal materials.
Instances
Only applicable if you're already geared enough and are familiar with the mechanics of the instance/s that you're doing.
Casino
Main Article: Casino
If you're looking for a chance to win a bunch of random useful items (Press Your Luck), looking for an official headgear (Headgear Gambler), or looking to take your chance in upgrading your equipment (Wheel of Fortune), then the Casino might be the place for you.
Donation Path
Main Article: Donation Rewards - Currencies
If you have donated to the server and acquired Donation Credits, talk to the Donation Girl NPC to purchase various in-game currencies. You can then use these currencies to purchase items and equipment from in-game shops.
- 1B Zeny Bags
- BraveRO Tokens
- War Badges / Elite Temple Discounted War Badge Shops
- Heroic Coins
- Combat Coins
- Victory Badge
- Seasonal Currencies
STEP 5.1: Road from Hero to Elite

Consolidated Guide: Hero and Elite Hero
When you've geared yourself enough or have already replaced some or most of your Returner's Set items, it's time to start your path in becoming a Hero. The road is long and tedious, but it's the way in making your character stronger.
1. Becoming a Hero Character
Main Article: Hero Quest
This is your first step. Complete this quest and officially become a Hero.
2. Ranking Up Your Hero Character
Main Article: Ranking Up Your Hero Character
In order to rise up the ranks as a Hero, you'll need to earn Hero EXP. As indicated above in the main guide, there are various ways of earning this EXP and ranking up your Hero. You can check your current rank and other details by using the @hero command.
- Once you've reached 12,553,600 Hero EXP you'll now become a Rank C Hero, and you can now begin the Rank C Weapon Quest. You need to do this quest before you reach Rank B Hero (48,567,000 Hero EXP), otherwise, you'll be unable to do the Rank C Weapon Quest anymore, and you'll only be able to do the Rank B Weapon Quest.
- Once you've reached the required EXP and rank for Rank B Hero (48,567,000 Hero EXP), you can begin the Rank B Weapon Quest.
- For both quests, you'll be rewarded a weapon suited for your class.
- Be careful when choosing because once you've chosen and acquired the weapon, it's no longer possible to exchange it for a different weapon. However, the Rank B and C weapons are tradable and you can buy those from players.
- Due to Death Weapon and Elite Weapon updates, most classes can avoid the hassle of farming/buying the required materials for the Rank C and Rank B weapon quests. As such, after becoming a Hero, you can just earn enough EXP to begin the Elite Hero Quest.
- The idea behind this is that, once you get to Elite Hero and acquire your Elite Weapon, the weapon that you got from the Rank C and B weapon quests will most likely get overshadowed. More often that not, the hassle of getting the materials for the Rank C and B weapon quests isn't worth it. Although, for certain cases, weapons like Shamshir and Gastraphetes are used. You can just check each weapon and see if it's gonna be worth your time getting them.
3. Taking on the Elite Hero Quest
Main Article: Elite Hero Quest
Once you've reached a Hero EXP of at least 98,000,000 and you're already a Rank B Hero, you can now begin the quest to become an Elite Hero. After becoming an Elite Hero, you gain access to the @elite command. For a fee, you'll also gain access to the Elite Temple and all of the various shops and services inside.
4. Acquiring Your Elite Weapon
Main Article: Elite Weapon
After completing the Hero Quest, the next step is to make your Elite Weapon.
5. Joining a Division
Main Article: Hero Division
Once you've obtained your first Elite Weapon, you can now finally join a Division.
6. Getting Your Division Glove
Main Article: Division Glove
Once you've joined a Division, it's time to create your Division Glove.
Donation Path
Main Article: Donation Rewards - Usables
If you have donated to the server and acquired donation credits or Donation Tokens, you can talk to the Donation Girl NPC or to the [Donation] Misc Shop in @go 49 to avail of various service that allow you to autocomplete various parts of the Hero-Elite Hero Journey. Alternatively, you can instead avail of the Spirit of Heroism to instantly become an Elite Hero with various benefits.
STEP 5.2: Joining PVP

Once you've geared up, or even if you're still using your Returner's Set, you can always try and participate in these PvP categories to earn rewards.
Battlegrounds
Main Article: Battlegrounds
Participation rewards Silvervine Fruit, Battle Badges, and Yinyang Flowers. Silvervine Fruit is commonly exchanged into Mora Coins in order to enchant Mora Equipment. Battle Badges are the currency used to purchase various items in the Battlegrounds Shop in @go bg or in the Discounted Battlegrounds Shop inside the Elite Temple. Yinyang Flowers are used to enchant Shapeless Weapons.
War of Emperium
Main Article: War of Emperium (WoE)
Join active guilds and lay siege to your opponent's castles. Even if you're inexperienced, you can still earn from this event by providing buffs, such as a Genetic's Full Chemical Protection and a Soul Linker's various link skills.
Combat Training
Main Article: Combat Training
Combat mission is a daily PVP task. The purpose of this task is to kill some people in PVP Arena (at Hero Arena/3rds Arena). Here you can get Combat Coins which can be used to buy useful gears.
500-PvP Event
Main Article: 500-PvP Event
This is an automated event wherein you duke it out with other players. The last player standing wins.
Hero Arena
Main Article: Hero Arena
EXTRA STEPS: Roads Beyond Elite

Division Events
Main Article: Division Events
Save the Princess (STP) and Clash of Divisions (CoD) are now available as division events. Use @schedule to know when the next division event will run. Take note that whichever division event will activate next is random. Participate here to earn Event Salaries, Weekly Salaries, and Daily Salaries.
High Level Instances
Elite Dungeon
Main Article: Elite Dungeon
Instance Guide: Instance Walkthrough (Elite Dungeon)
Elite Endless Tower
It's basically a ramped up Endless Tower, and the monsters and bosses inside are way more difficult. The entrance is found inside the Elite Temple. You need a party to complete this instance and a Key to Tower of Abyss to enter. The key drops from completing the Elite Dungeon. The key may sometimes be included as rewards in seasonal events and/or compendiums/battlepasses.
Guild Instance
Main Article: Guild Instance
More Instances
These instances may require quite a bit of gear and experience in order to successfully complete them.
- Old Glast Heim
- Horror Factory
- Orcs Memory
- Malangdo Culvert
- Faceworm Nest
- Nydhoggur's Nest
- Wolfchev's Laboratory
Hero Happy Hour
Main Article: Hero Happy Hour
Other Useful Pages

- For the most part, you can probably search up an item in the wiki search box. However, this page has most custom items catalogued so that you'll have an easier time looking for them.
- You can use various currencies to purchase and obtain items and services from different NPCs and locations.
- A recent addition to spice up the PvP and PvE scenario.
- Take a look at various headgear sets that are obtainable in BraveRO! Note that some of these sets may be only available during Seasonal Events.
Vanilla Headgears and Vanilla Enchants
- These are headgears that you can customize with various effects.
- Rare Headgears are a classification of middle headgears that are typically used as PvP equipment and gives the effects of reduces After-Skill Delay by 30% and Increases Physical or Magical Damage against Demi-Humans by 25%
- Variant Rares are middle headgears that are highly customizable. They are now similar to vanilla headgears in the way that they can be enchanted with various effects. By default, all variants have a 30% After-Skill Delay enchant on the 2nd slot. You are given the option to choose which one of several enchants you'd like to select for your 3rd Slot Enchant. The 4th slot enchant is assigned randomly and you cannot choose which one to receive.
- If you want to have a companion on your journey or wish to have additional stats and effects, then a pet is what you might need.
Premium Stylist and Costume Specialist
- If you have acquired a Premium Stylist Service item, use it to fully avail of the Premium Stylist NPC's service for the character that used the item.
- If you have a headgear that you wish to become a costume, look for the Costume Specialist in caspen 183 221 and bring 1x Fashion Voucher and 3x BraveRO Tokens. Headgears that have been turned into a costume cannot be reverted back into their original states. Headgears turned into a costume will lose their stats and effects.
- Knowing what elements to use against certain enemies can make the difference between victory and death.
- These Gems essentially work like cards for accessories, but give more specialized effects.
- If you have some common items that you might wish to have an extra slot, feel free to try out this system. This does not work for any custom items.
- Some might be beneficial, while most have negative or harmful effects. Knowing which effect has afflicted you comes in handy when trying to remove it.
- No need to carry around 1,000 pieces of an item in your inventory, thus leaving you overweight. You can open your storage almost anytime, and anywhere.
- Various in-game content have the requirement of being in a party or in a guild.
- Want to know why cards work they way they do? Look no further.
- Want to spice up your experience a little bit? You can change your user interface by using custom skins.
- Loved playing in the realm of BraveRO? You can support BraveRO via your kind donations.
Common Mistakes

If you're a new player, kindly read through this section as well. Here are some of the most common mistakes that new (or even older) players might do. It might save you some headache in the future.
- You failed to acquire items by carrying too many items or being overweight
- Please remember that your character has a limited weight capacity which is primarily determined by your STR stat. This determines the amount of items that your character can carry. You can gain an extra 2,000 weight capacity if you're a Merchant-class, and even more if you will use Gym Pass to master the Enlarge Weight Limit using another class or mastering it a second time using a Merchant-class. If you attempt to acquire more items when your character is already at 70~90% weight capacity (indicated by a status icon on your right side), you might lose those items. Make sure to store unnecessary items in your cart or your storage/guild storage.
- Please remember that each item has a 30,000~32,000 stack limit. If you attempt to acquire more of a certain item when that item already has like 29,521 pieces on you, any additional items that you will attempt to acquire might be dropped to the ground or forever lost. Make sure to store excess items in your storage/guild storage.
- In the same token as the things mentioned above, avoid removing cards from your equipment if you're carrying too many items or your character is overweight as those items might be lost.
- All characters can only carry a maximum of 100 unique items. Any other unique items gained afterwards, whether by killing monsters, looting, or from NPC rewards, will not be sent to your inventory. They will either drop to the ground, or you simply won't get them at all.
- Take note that certain items have their normal versions and bound versions. For example:
- Cards like Moonlight Card, and [Bound] Moonlight Card are treated as separate unique items in your inventory/storage.
- Certain items acquired from Discord Giftcodes may be account bound, even if they don't have any indicators in their names or descriptions. You will notice this if the items won't stack with the regular versions of the item. For cases like these, these items are treated as separate unique items in your inventory/storage.
- Take note that certain items have their normal versions and bound versions. For example:
- You have unknowingly bugged your guild storage, and you're unable to open the guild storage.
- It's pretty common for players to store extra loot in their own personal guild storage where they are the only one who has access to it, along with any characters from their alt accounts, and other characters in the same account.
- More often than not, some players accidentally bug their guild storage. When this happens, players will be unable to access their guild storage (@gstorage). To fix this, you have the following options:
- Use the Guild Storage Debugger in @warp prt_gld 200 160. Only the Guild Leader can use this NPC. This requires all other guild members to be offline/logged out. Once all other guild members are offline, the Guild Leader must then go offline/logout in order for the NPC to work. This NPC is added on May 18, 2026.
- Wait for a server reboot. However, take note that reboots doesn't happen that often. Or make a Support Ticket. Make sure to indicate your guild's name and the guild master's name. Afterwards, wait for it to be responded to by the Admin. Use these two options ONLY if the Guild Storage Debugger doesn't work for you, for whatever reason.
- To avoid getting your guild storage bugged, avoid doing the following things:
- Avoid using the guild master character to kick members from your guild. Make sure to use the characters that you no longer wish to be in the guild, and make them leave normally by quitting the guild.
- Avoid deleting characters that are still members of your guild. Make sure to have those character normally quit the guild first before attempting to delete them.
- A few tests have been done, and it has been observed that the guild storage usually bugs if the character that was kicked or deleted is in the same account as the guild master of the guild. However, just to be on the safe side, make sure to just do the same for characters in other accounts.
- There may be other undocumented scenarios where a guild storage may get bugged. However, if you simply use your guild normally and don't do any unnecessary stuff, you should be fine.
- You accidentally break your armor/weapon when refining even while using Pure Elunium and/or Pure Oridecon
- Please remember that Pure Elunium only works for protecting your armor up to +8. If you attempt to refine a +8 Valkyrie Armor to +9, the Pure Elunium won't protect your armor from breaking. However, you don't have to worry much about using Pure Oridecon since it protects your weapon all the way to +10.
- Please remember to use normal Elunium with Pure Elunium, and normal Oridecon with Pure Oridecon.
- Some players might think that Enriched Elunium and Enriched Oridecon (which are both known to increase refinement success) will work along with Pure Elunium and Pure Oridecon. However, this isn't the case. Using Pure Elunium and Pure Oridecon while refining using Enriched Elunium and Enriched Oridecon will not protect your equipment from breaking.
- You're choosing a reward from an NPC (Paragon, Raffle, etc), but the text in the dialogue window disappears and you're no longer able to get your reward.
- All dialogue windows in-game have a limited time before they 'expire'. As such, you should not take too long in deciding an option and choose it immediately. Otherwise, you might lose out on your reward.
- You got banned after trying to login to the game using incorrect username/password too many times
- Fear not! Your account or device isn't permanently banned. It's simply a temporary IP ban issued by the game itself (not from any GM) and will be lifted after a while. However, next time, make sure to type in the correct account username and password to avoid getting 'banned' this way again.
- You got banned from doing something that seemed 'normal'.
- If you find your account to be temporarily banned, and when trying to login it will show you the date when you will get unbanned, your account is most likely banned by a Game Master for breaking the rules. To avoid getting banned in the first place, make sure to read up on the Server's Rules and make sure to follow it. Also try asking around first, especially from Support Players or a Game Master, whether a certain activity is allowed or not.
- You bought an item from a player/vendor for a certain amount of zeny, only to find out that its common price is usually much lower that what you bought it for.
- Unless you know what you're doing or you don't really mind spending a lot, make sure to check an item's current market price by asking other player in-game, in the forums, and/or in Discord.
- Do take note, however, that players value items differently. One player might sell a headgear for 100b Zeny, but you have known that it usually is being sold for around 50b. While you can ask the player nicely if they can somehow lower their price, it's not worth it to start an argument with them because you two can't agree on a price. Simply walk away and find someone else selling that item.